How to Make Freeze Dried Sweets at Home?
Making Freeze Dried Sweets at home can be a fun adventure. This process allows you to create delightful treats with unique textures. Imagine biting into a freeze-dried strawberry that is crisp yet bursting with flavor.
It all starts with the right ingredients. Fresh fruits, candies, or even desserts can be transformed. You’ll need a freeze dryer, which is a significant investment. The process does take time and patience, but the results can be worth it. However, the learning curve can be steep, and not every attempt may turn out perfectly.
As you experiment, you might face challenges. Some fruits may not freeze-dry well. Others may lose their vibrant colors or flavors. Yet, each failure can teach you something new. Embrace the journey of creating Freeze Dried Sweets, and enjoy the discoveries along the way.
Understanding the Freeze Drying Process for Sweets
Freeze drying is a unique method to preserve sweets. It removes moisture without cooking them. This process maintains the flavor and texture. It can seem complex, but it is achievable at home. You will need a freeze dryer or an alternative setup. A reliable vacuum sealer can help, too. If you don't get it right, the sweets might turn out too tough or too chewy.
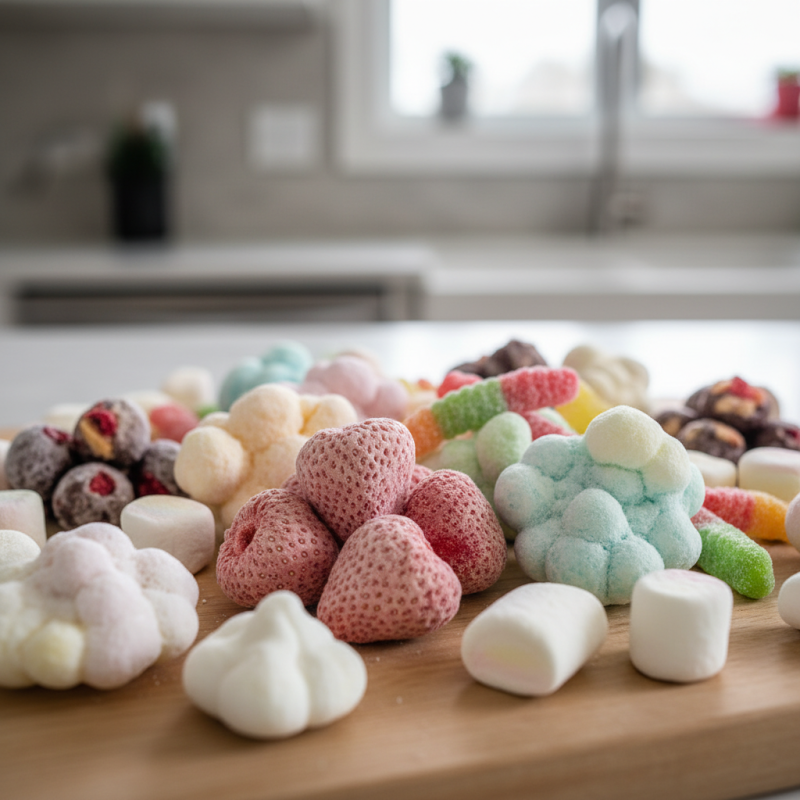
To begin, gather your sweet ingredients. Fruits, candies, or pastries work well. Cut them into even pieces; uniformity is key. Spread them onto trays without stacking. The freeze drying process involves freezing the sweets first. Then, a vacuum is applied. This stage is crucial. If the temperature fluctuates, the results may vary. You might not achieve the desired texture or flavor.
After the process, store your sweets in airtight containers. Check for any signs of moisture. If they feel soft, they need more time in the freeze dryer. Remember, it’s trial and error. Each batch teaches something new. Experimenting with different sweets can lead to unexpected outcomes. This journey of making freeze-dried treats is as sweet as the result!
How to Make Freeze Dried Sweets at Home? - Understanding the Freeze Drying Process for Sweets
| Sweets Type | Ingredients | Freeze Drying Time | Expected Texture |
| Fruit Leather | Pureed fruit, sweetener | 6-12 hours | Crisp and chewy |
| Chocolate Covered Marshmallows | Marshmallows, chocolate | 10-14 hours | Light and airy |
| Gummy Candies | Gelatin, sugar, flavoring | 12-18 hours | Crunchy and melt-in-mouth |
| Fruit Snacks | Various fruits | 8-16 hours | Crispy and flavorful |
| Meringues | Egg whites, sugar | 6-10 hours | Light and crispy |
Essential Equipment for Home Freeze Drying
When making freeze-dried sweets at home, the right equipment is essential. A home freeze-dryer is the primary tool you will need. This machine removes moisture while preserving the flavor and nutrients of your treats. Make sure to choose a compact model that fits your kitchen space. A quality freeze-dryer can be a significant investment, so consider how often you plan to use it.
In addition to the freeze-dryer, you’ll want some simple tools. Silicone molds can help shape your sweets. They are reusable and come in various designs. A vacuum sealer is also handy for storage. It keeps your freeze-dried treats fresh for longer. You might also need food-safe trays to hold your sweets during the drying process. The drying process can be tricky, sometimes resulting in uneven textures.
Experimenting with different recipes is part of the fun. Don't be discouraged if your first batch doesn’t turn out as expected. There’s a learning curve. Perhaps you’ll find some sweets are too chewy, or flavors are faint. Reflect on what didn’t work. Adjusting your methods can lead to better results next time. Enjoy the process and keep trying!
Choosing the Right Ingredients for Freeze Dried Sweets
Choosing the right ingredients is crucial when making freeze-dried sweets at home. Fresh fruits like strawberries, bananas, and apples are excellent choices. According to a study by the Food and Agriculture Organization, freeze-dried fruits retain approximately 97% of their nutrients. This makes them a tasty and healthy option for sweets. Selecting ripe fruits can enhance flavor. However, be mindful of their moisture content, as it affects the freeze-drying process.
When considering dry ingredients, opt for powdered sugar or natural sweeteners. These dissolve better in freeze-dried confections. Also, consider using organic or non-GMO ingredients for better quality. While experimenting, some ingredients may not give you the desired texture or flavor. For instance, avoid overly fibrous fruits, as they can be tough when freeze-dried.
Tips: Always wash and slice fruits evenly. This ensures uniform freeze-drying. Use a digital scale to measure your ingredients accurately. It helps in achieving consistency. Remember, not all ingredients may perform well in freeze-drying. Keep a journal of what works and what doesn’t.
Step-by-Step Guide to Freeze Drying Your Sweets
Freeze drying sweets at home can be a fun and rewarding experience. The process preserves flavors and textures beautifully. To start, gather your favorite treats. Consider fruits, candies, or even chocolate. Slice the fruits into even pieces. Smaller pieces dry more effectively. This step is crucial for even results.
Next, set up your freeze dryer. If you don’t have one, it may take time to find an affordable option. The machine should be clean and ready for use. Place your sweets on the trays in a single layer. Avoid overcrowding. This could lead to uneven drying.
Tips: Monitor the moisture levels. If the sweets feel tacky after the cycle, return them for additional drying. Test a piece as you go along. You might discover that some treats lose their charm when freeze-dried. Experiment and tweak your process. Remember, not every attempt will yield perfect results. Be patient and enjoy the learning curve.
Storing and Enjoying Your Freeze Dried Creations
Storing and enjoying your freeze-dried creations can be delightful. Once you've made your sweets, focus on how to keep them fresh. Use airtight containers to prevent moisture. Glass jars work well. Dark containers help protect against light damage.
When it comes to enjoying your freeze-dried treats, consider how you display them. A pretty dish can enhance the experience. Sometimes, simple is best. Share them with friends or family. They will appreciate the effort you put into making them.
Tips: Experiment with flavors. Different fruits or chocolates can surprise your palate. Also, note the texture. Some sweets become crunchy. Others may lose their original flavor intensity.
Store your creations in a cool place. Avoid warm areas to maintain quality. You’ll want to reflect on your results. What worked? What didn’t? Adjust your methods for next time. Each batch is a learning opportunity. Make notes for future improvements.